Quick soil NPK test (10 te
About this product
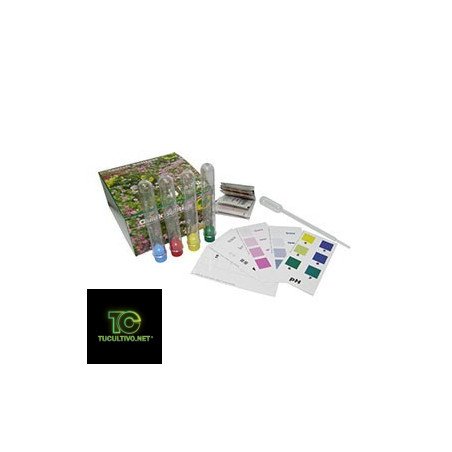
Hanna - Quick nutrient tests to determine the nutrients available in the soil. It measures pH, nitrogen, potassium and phosphorous in the growing substrate at any time.
Quantity:
Sent from
Add to wish list
More product information
Quick test to check macronutrient levels in the substrate along with pH at any time. It is important we give our plans a soil rich in nutrients so that they develop to their most. The device will be very useful while growing to see how the soil is behaving and increase or reduce fertilizing accordingly.
The quick test Hanna consists of a box including enough reagents to test each parameter 10 times. Every test is therefore done separately and it is not a single test which determines the 4 values. We'll have to prepare a solution with water and soil and then take 4 test tubes of it. Each tube will reveal the value of each parameter: acidity (pH), Nitrogen, Phosphorous and Potassium concentration.
If we keep these parameters under control during the whole cycle and supply our plants all they need, we'll get an optimal crop with healthy and productive specimens, free from all kind of deficiency, which will lead to larger productions.
Instructions for use of Hanna HI3895 - quick NPK test:
- When to do the test?
The test must be done when we transplant a plant to a pot with a different substrate and a month afterwards to see if fertilizing is right, if we are falling short or overdoing it.
- Colors:
pH, nitrogen and potassium tests are measured according to a color scale which we have to put aside the test tube to compare with it until we find the level that matches best.
The scale is divided in 8 segments (traces, traces-low, low, low-medium, medium, medium-high, high, very high). Traces means there is almost no presence of the mineral and very high means there is an excess of it. The ideal case would be to have medium or medium-high.
The phosphorous test is performed differently. In this case we have a scale where instead of a color, you must try to see the white line that appears in the marker. This test shows 4 different levels (traces, low, medium and high) where ideally, it would read "medium".
- How to carry out the tests?
In order to do the soil test we'll have to take samples of the soil. It goes without saying, one shouldn't take if from the top part but rather from 20-40 cm under the surface. In pots, for instance, we should take it from the lower part. We'll need about a full cup of substrate.
1. Do the pH test.
We must take about a teaspoon of soil and put it inside the test tube, then fill it with water (distilled or bottled water) until we reach the line that marks 2.5ml (the lowest one). Use the measuring card to see the division. Once the mixture is done, close the tube and shake it well for about 30 seconds so that water blends with soil well.
Once this is done, all we have to do is introduce the reagents of the pH envelope inside the test tube and shake again until the solution adopts a homogeneous color. Allow it to rest then for 30 seconds. All we have to do is compare it with the scale of colors to know the pH value.
2. Prepare the solution for the other 4 tests.
Mix the cup of soil with 8 cups of distilled or bottled water and stir well. Allow it to rest for 30 min to 1 day (depending on the texture of the substrate). A deposit must fall down to the bottom so we can take clean water from the upper part.
3. Do the nitrogen test.
Use a 2.5ml pipette to catch water from the upper part of the solution (avoiding taking any rests of soil from the bottom). Introduce the water in a test tube and pour a nitrogen test inside. Cover it and shake it for 30 seconds again. Wait for 30 extra seconds until the mixture has properly rested. Check the nitrogen level with the nitrogen scale (pink color).
4. Do the phosphorous test.
Repeat exactly the same steps as with the nitrogen test. Use the phosphorous envelope and the phosphorous scale (the blue one).
5. Do the potassium test.
This one is done differently. Take 0.5ml of the upper part with a pipette and put it inside a clean test tube. Take a measuring scale and fill the tube with distilled or bottled water until the 2.5ml line which is the lowest one. Cover it and shake it.
Pour the potassium test envelope and stir for 30 seconds. Once the reagent is properly dissolved we can compare it with the color chart on the potassium card.
You have accurate values of pH and NPK in a fast and reliable way.
It is important to make sure we're not taking any rests of soil or blowing air into the pipette when taking water.
Product details
Leave your product review
Products in the SAME CATEGORY





Grade Comments (0)